Installation Guide – Setting up tCrypt2Go and vCrypt2Go to Encrypt Portable Hard Disks
Warning: This guide is for system administrators or experienced enthusiasts. It may involve a steep learning curve if you are a novice, and risk breaking systems or losing data if the involved low-level system tools (such as diskpart) are not used carefully. There is no guarantee. One way to avoid risk is to engage professionals to perform the process on one of the freelancing platforms.This is an article for users illustrating how to encrypt a portable hard disk (click here if you have a thumb drive or memory card instead) as a partition for use with tCrypt2Go lock-and-unlock utilities for TrueCrypt Portable (also applicable to vCrypt2Go for VeraCrypt unless otherwise specified).
(This is a sub-article – click here to view to the list of articles or the main article of tCrypt2Go and vCrypt2Go)

List of Steps
- Creating 2 Partitions and Copy TrueCrypt/VeraCrypt Files to the Partition Labelled UNPROTECTED
- Eliminating Free Space on UNPROTECTED Partition (Preventing Users from Saving Files into Unencrypted Area)
- Encrypting Second Partition with TrueCrypt/VeraCrypt
- Unlocking Encrypted Partition
- Labeling Encrypted Partition as 'PROTECTED'
- Copying TrueCrypt/VeraCrypt Files to Encrypted Partition
- Suppressing 'Format Disk' Prompt with Diskpart
Required Files
Supported Hardware
- A portable drive of Fixed Disk type (such as a USB hard disk, NOT thumb drive or memory card.
1. Creating 2 Partitions and Copy TrueCrypt/VeraCrypt Files to the Partition Labelled UNPROTECTED
To encrypt portable drives of a Fixed Disk type (where more than one partition is supported), there will be two partitions. We need to partition both using the Disk Management utility in Windows.a. Connect a portable drive to be encrypted to a PC running Windows 7 or above. (required for an option in newer diskpart)
b. Run Disk Management (press "Win+R" hotkey, enter "diskmgmt.msc")
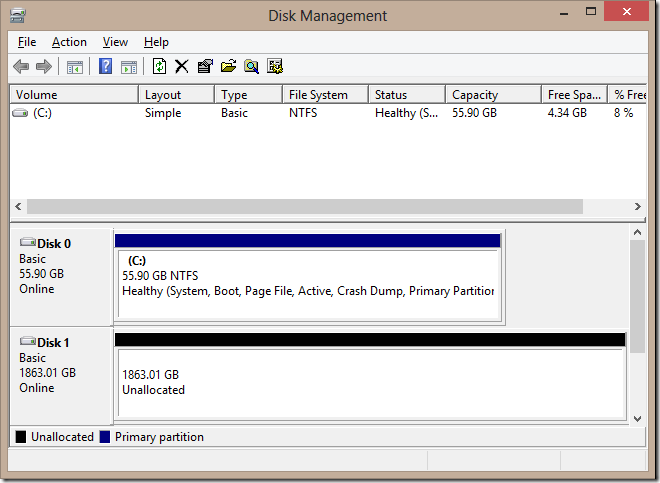
c. Create two partitions. smaller one: 20MB. larger one: All available space. The smaller partition should be formatted as FAT32, while the larger one can be anything at this stage.
Label the smaller partition "UNPROTECTED" (to make it clear to the user that it is the gate to the PROTECTED drive to be unlocked using TrueCrypt/VeraCrypt via vCrypt2Go lock-and-unlock utilities.)
(Also, identify and write down the disk number and partition number of the encrypted partition on this screen. It will be required in section 3 while using diskpart. In this case, disk number is 1, encrypted partition number is 2)

Download and extract "tCrypt2Go and vCrypt2Go.zip" and copy all files under "tCrypt2Go\Hard Disk" or “vCrypt2Go\Hard Disk” folder to the root of the UNPROTECTED drive:
- .DO_NOT_DELETE (hidden from Windows with a hidden attribute)
- TrueCrypt/VeraCrypt for Mac
- TrueCrypt/VeraCrypt for Windows
- Lock_Mac.command
- Unlock_Mac.command
- tc.exe/vc.exe (REQUIRED: download TrueCrypt or VeraCrypt and perform installation or extraction, then copy TrueCrypt.exe or VeraCrypt.exe here and rename them as tc.exe or vc.exe)
- TrueCrypt.sys/VeraCrypt.sys (REQUIRED: as above, copy TrueCrypt.sys or VeraCrypt.sys here)
- truecrypt-x64.sys/VeraCrypt-x64.sys (REQUIRED: as above, copy TrueCrypt-x64.sys or VeraCrypt-x64.sys here)
- AUTORUN.INF (to prevent older Windows versions from executing malware triggered via Autorun mechanism; hidden from Windows with a hidden attribute)
- .Unlock.exe (unlock utility for Windows; hidden from Mac with a preceding dot)
- .Lock.exe (lock utility for Windows; hidden from Mac with a preceding dot)
- Lock.app (lock utility for Mac; hidden from Windows with a hidden attribute)
- Unlock.app (unlock utility for Mac; hidden from Windows with a hidden attribute)
- ._Lock.app (specifies an icon for Mac; hidden from Windows with a hidden attribute)
- ._Unlock.app (specifies an icon for Mac; hidden from Windows with a hidden attribute)
![Image(6)[6]](https://blogger.googleusercontent.com/img/b/R29vZ2xl/AVvXsEjIM0XYPhablqaAKMtQUY0d2sKseHsQgC_loXMKSid5i-QJKVEe7hKmeaA6wA0_9b7oaR60z-XszQYUD-zb1-4rYWB_0W7PLctECKK_Cd80VWn-yWc3g7QvSzsSewBeKgFHG1zRRTcdOmAg/?imgmax=800 "Image(6)[6]")
f. Right-click "DO_NOT_DELETE" folder, choose "Properties"
Configure the hidden attributes accordingly. Also, ensure "Read-only" is not set on all folders except AUTORUN.INF; otherwise, the drive cannot be written.

2. Eliminating Free Space on UNPROTECTED Partition (Preventing Users from Saving Files into Unencrypted Area)
After copying the files, the disk will still have a few megabytes of free space:
Record the red-circled area above, it will be used in step 2b. (In above example, it is 3510272)
We need to eliminate that so that user will not be able to put any file unencrypted at all.
a. Run Command Prompt as Administrator
b. Create a dummy file by entering fsutil file createnew DUMMY_FILE {input here the free space shown above without commas}

c. Finally, copy DUMMY_FILE into "UNPROTECTED\DO_NOT_DELETE"

d. The end result shows that there is no free space left.

3. Encrypting Second Partition with TrueCrypt/VeraCrypt
Note: the screenshots below are from TrueCrypt only, as there is not much difference between TrueCrypt and VeraCrypt.a. Download and run TrueCrypt Setup/VeraCrypt Setup (see step 1c above for the location of this file) and install the program, or specify to extract the files to a location.
b. In extracted or installed directory, run "TrueCrypt Format.exe/VeraCrypt Format.exe"

c. Select "Encrypt a non-system partition/drive".
d. Select "Standard TrueCrypt/VeraCrypt" volume.

e. Choose "Select Device".

f. Highlight the partition to be encrypted.

g. Choose "Next".

h. Create encrypted volume and format it.

i. For "Encryption Algorithm" and "Hash Algorithm", choose any settings as desired.

j. Enter the maximum available size to be encrypted.
![Image(62)[12]](https://blogger.googleusercontent.com/img/b/R29vZ2xl/AVvXsEjW3xziXItnGtskSX3mf0zSWKSAsJhHp3wIfulD5Nms-tfg2noF1sPI8Y4DZU5S1N8ODHKmPrUuDn3cxASw8CXWwY1fr65et7_m4qKBYZOmgHB5Re_UGBzDW7kWtER6Qw4R6GwkQ0gVCkMi/?imgmax=800 "Image(62)[12]")
k. Enter a secure password twice.
![Image(63)[12]](https://blogger.googleusercontent.com/img/b/R29vZ2xl/AVvXsEjKYHHOC4lSBxKKerz2G6D611m4O10k1EiqP230CZVNwtelgTbGg1KFTnjBO4tFJ9WBQA3Li10iUdTLHiRaV75NVeO6v4leS14E0juho9HpKc0baiVFQa_kColTvcP3ZnccMwXjfWmuY168/?imgmax=800 "Image(63)[12]")
l. "Yes" for Large Files.
![Image(64)[12]](https://blogger.googleusercontent.com/img/b/R29vZ2xl/AVvXsEhiG29EZEDTXU0xovm5qAYtUGbvZe_ttYWNO4qz6f2CeMqQbh3OZ5feTjmSWRUceGD7KFMsO7tGkTbCOzsRAqsZghIAT-mVQ8d6-4l2YSPzDfvN1uAIMgR4LhMbCQ-xFQ4nFjZ-bP41Xxj-/?imgmax=800 "Image(64)[12]")
m. Choose any desired file system (according to the explanation at the top of this guide). In this example, the below are selected:
- Filesystem: NTFS; Cluster: Default; Quick Format: Checked
(Note for exFAT and TrueCrypt users: Unless you use VeraCrypt, this TrueCrypt format tool cannot format a drive as exFAT. TrueCrypt users need to perform it in the Command Prompt. See Optional section for how.)
![Image(65)[12]](https://blogger.googleusercontent.com/img/b/R29vZ2xl/AVvXsEiquwOsoGJ4DhQ9PSaQrgxy7UCmwyDZPN0gaym3oF02bpBm79cURfLgTgUMrUECmx3S1rpR7oqKTtANj7CdqcQWhSPybc66aAVALMdyVGgXpftI90XyZksjX7bm5v_xJ1vpc0-nmac-S-ZT/?imgmax=800 "Image(65)[12]")
n. Answer "Yes" if the below warning is prompted.
![Image(66)[12]](https://blogger.googleusercontent.com/img/b/R29vZ2xl/AVvXsEjyeSgJqjRt_Syzwrx2oFSkxXVrUEQzPnD7PPyHnAorwJch-NhoIwI0C2Gln7bMIUWYOIowtBInL_eBO0wMmzBy-H13I2I8jnA3FqbmPna_UvVOQxh0ToAd4qDZ34ArsWGi2Ie-aqCAyw-W/?imgmax=800 "Image(66)[12]")
o. Answer "OK" if the below warning is prompted.
![Image(67)[12]](https://blogger.googleusercontent.com/img/b/R29vZ2xl/AVvXsEj4Gh1qx5M9CFBnTKT02YoC9cjQ4Kgm9wvu6PpTMkmJas_zWSB42fJjH3wkOUTFST9jyFLcSppAHdFNF3WOzzgkw9j4OchexH5fkouy5CgDLhY0lIG5bysQJAreRzwz1xLJ3kIN3Z7cT0gU/?imgmax=800 "Image(67)[12]")
p. Click OK and Exit to complete the procedure.
![Image(68)[12]](https://blogger.googleusercontent.com/img/b/R29vZ2xl/AVvXsEhTzbr8peIPab8TDdOqsqPmvZZ91DoI744-jmg-S1nOzoOfmfMesRwjSoXa9Zr9qCHs8_i_Ap47Gg5n4UrdiflShf_NvAW7W6n5hmC1l8EDQIynE5qQuZG3miF3SqIL5XJCnvaVQ3H4hKMU/?imgmax=800 "Image(68)[12]")
![Image(69)[12]](https://blogger.googleusercontent.com/img/b/R29vZ2xl/AVvXsEi2RhHcS9ORAs_ka72vOufEhx5OG7RRG8QdYmDku_EgGlgPAQrDstsmDcQvlqLkEs-dNStvQ3Xox4pFqR6Y7vlHtyTquoWPNtwKX2QGaktPeALL1ax7svg9CwRl9UOFR8k1HUisx80uFqxS/?imgmax=800 "Image(69)[12]")
4. Unlocking Encrypted Partition
a. Unlock by double-clicking "UNPROTECTED\.Unlock.exe".![Image(70)[12]](https://blogger.googleusercontent.com/img/b/R29vZ2xl/AVvXsEg9sKez6hidgiqBZRY9w64hneSKQcthyphenhyphenQY7teTRQDwEn5mp_Y3kctmnn_KUr-z5qeWkju4WdCETmL3XICufhFpMBw9oSKb-cvLolAZR0X3iTi5CkZF4W-LwG6Vy4MQ6zgC84DXypRPiO4IS/?imgmax=800 "Image(70)[12]")
(Note: If you are mindful, you may have noticed in the example above, there are no preceding dot characters and the Mac-related files are removed. You may do so only if you do not require Mac support.)
b. Enter password.
![Image(71)[12]](https://blogger.googleusercontent.com/img/b/R29vZ2xl/AVvXsEiAXy3PVNmiqJHHDb85GOkFxPyey9Y7Xtt0Wvnv0XD989ZFHx7ihnP9OuJyhEP1fAfIeC_uFcxLwmorWzsHa1wNWs4GNF-Lv-DKuKPIrAiEygShMAFzXyuYpJ7BnMlEuhd5EUU-S3J-Cvsu/?imgmax=800 "Image(71)[12]")
c. Then the encrypted partition will be unlocked as below (E:\). Right now it is empty.
![Image(72)[12]](https://blogger.googleusercontent.com/img/b/R29vZ2xl/AVvXsEjdnew0Ka1_Oa22K2m1DT9Cq0i3LUQ0mSQjUIT9Zgj-AO-TBVSHisKZCMAOAhieFOnhK-khNToGDdw71Pik-d4TuDWw3PZaJhDEpSSNw5vSc5JRoLZAbjlQ8OEXki9noTgzzWgL3VOmC3Uh/?imgmax=800 "Image(72)[12]")
5. Labeling Encrypted Partition as 'PROTECTED'
a. Open "Computer". Label the encrypted partition 'PROTECTED'.![Image(73)[12]](https://blogger.googleusercontent.com/img/b/R29vZ2xl/AVvXsEgxd8M36-yhr4-W_TkKG5IVvKzXOXhj2LOhmmVqhNGXS7RDWCpqudy78TfSzSXmAa-XLW0nC8DxyR2Jzj7vyiALtcIqRCLARu0MpsTCkOUovYBQK1gOuaRL_OrE7fW8Cqo1SKMzFSd_qBKB/?imgmax=800 "Image(73)[12]")
b. Run "diskmgmt.msc", confirm the partition layout and labels are as follows:
![Image(74)[12]](https://blogger.googleusercontent.com/img/b/R29vZ2xl/AVvXsEjsaHpxX9527sla88YFn-5-80DDwlAqkzG9P2uX_2NyT2QV9vx8Uzfa7c9KPowwWa0lzs_3Wj-EHCzD3IyhH176DCCHefejtrS8otj1IEGqS08AvAIa2h5DyXkOBaog0zG7uoQ8rl5nm1Ja/?imgmax=800 "Image(74)[12]")
(Note: the volume labels may not always show on Windows, but it does on Mac. It is recommended to name them so for easier identification.)
6. Copying TrueCrypt/VeraCrypt Files to Encrypted Partition
Now, we will copy a few files there so that users can easily lock it within the encrypted partition.a. Copy the a few files from step 1d here (so that users can conveniently lock the drive after use)
- .DO_NOT_DELETE (hidden from Windows)
- AUTORUN.INF (hidden from Windows)
- Lock.app
- ._Lock.app (hidden from Windows)
- .Lock.exe
![Image(75)[12]](https://blogger.googleusercontent.com/img/b/R29vZ2xl/AVvXsEhP0-TxBfQiafbtC3GkofVPmIQzPjEoOeODJ-tx0HTi73qOCPbyhB9hpKXn8X0vs7qzscTCwmJDai01xY-sT-Qw8muJ8s3pKr4SJ7SCiSWIMEtwtOD_3HEA_VLcKQRpwwe7AZaPeJvkZwJI/?imgmax=800 "Image(75)[12]")
c. Double-click ".Lock.exe" to test. If the encrypted partition letter (e.g. E:) becomes unmapped (dismounted), it works!
7. Suppressing "Format Disk" Prompt with Diskpart
There could be an annoying imperfection – whenever the drive is connected, Windows will asks whether you want to format it or not.![Image(33)[12]](https://blogger.googleusercontent.com/img/b/R29vZ2xl/AVvXsEjK8pmq03fpVwbrJ3UnypWb1Vjir5-5cHHFV1W6hlN8ZD4lLRRIjp1H7wFBCY6OJcuPxiYrDrK4rtTGdhLnD4k9NLdi9vLJG8skYtj5-97En19UAHrQPXYELhyWrVN1hvX40x0pnP37ZIxm/?imgmax=800 "Image(33)[12]")
To work around the issue, use the command line disk partitioning tool "diskpart" to modify the partition type to 0x64. (Please make sure the below procedure is performed on Windows 7 or later only.
a. Run Command Prompt as Administrator
b. Enter diskpart
![Image(34)[12]](https://blogger.googleusercontent.com/img/b/R29vZ2xl/AVvXsEhm1JHJ5x4XFQB264rODyMrMszfiLw0_3YAQ3t0UmiOJUVy95TRqu39c0uMXsDlZCbhaqgJt6ri5UUaZ1aVVWxHnhsN39lgOTK0T_uH6F4lM4vLnGY3FCIOsf0WvjtfbP1ctiMATO5MJbIA/?imgmax=800 "Image(34)[12]")
c. We will now use what was written down in section 1c. (disk number and partition number)
For this example, enter select disk 1
![Image(35)[12]](https://blogger.googleusercontent.com/img/b/R29vZ2xl/AVvXsEgHwLH2zboUXnOFu-cDO7qD6XVy3QZL21445loG_xmdzEogL9oX39k94zs7g6PMjnCWMRJMHpN-omdz2rlNWMOv16p03HTuSy5V6fuS2itjhKdFC57iMaAIlRRFFBwZdvnNU1CCOhKfpL4I/?imgmax=800 "Image(35)[12]")
d. Enter select partition 2
![Image(36)[12]](https://blogger.googleusercontent.com/img/b/R29vZ2xl/AVvXsEiO5nP9zEm3IjZDTs5Y0KrhWiY9ddWhtyXXa0ncEad2gBxFYiJvWuIeFJNFfqV9zDC89KYKvVRklU1S4MkQdk1xPwHExwC77tUItpn0CDzzm2LbrMDb1qyln87sS87s4a__ruF3N4c7CXhM/?imgmax=800 "Image(36)[12]")
e. Enter set id=64
![Image(37)[12]](https://blogger.googleusercontent.com/img/b/R29vZ2xl/AVvXsEh7bc1F_sD4Z_bg44etpLviNNcOBF1vQ5h8SxwaSU-BlHm7ZwWR1SNayfvrxwoShFBU3vMOrdeGiQwxjeDPEonx4LDULbspzEOKQApiWCdKCjAHdSgbZfwdcjmfIFW4wW1CxMQ2yL2LOnew/?imgmax=800 "Image(37)[12]")
Finished.
List of Articles on tCrypt2Go/vCrypt2Go
- Introducing tCrypt2Go and vCrypt2Go – Lock-and-Unlock Utilities for TrueCrypt and VeraCrypt Portable
- Technical Overview – How tCrypt2Go and vCrypt2Go work
- *You Are Here* Installation Guide – Setting up tCrypt2Go and vCrypt2Go to Encrypt Portable Hard Disks
- Installation Guide – Setting up tCrypt2Go and vCrypt2Go to Encrypt USB Thumb Drives
- User Guide – How to Unlock and Lock Encrypted Drives using tCrypt2Go or vCrypt2Go
- Enhancing and Troubleshooting Common Issues with tCrypt2Go or vCrypt2Go
Welcome to support this project by buying a cup of coffee ☕ if this tool is useful to you. 😊 Thanks!
Comments
Post a Comment